Use Thermal Imagery For Process Problems
Sept. 28, 2009
10 min read
Advances over the last several years have transformed thermal imaging from a tool for the specialist to one that plant personnel can use for regular maintenance and troubleshooting process equipment. A thermal imager enables a technician to diagnose root-cause more efficiently while also often identifying other potential problems during the same inspection. Unlike regular digital cameras that capture images of visible light reflected by objects, thermal cameras create pictures of heat, essentially measuring infrared energy emitted from objects and then converting the data into corresponding images of temperature. In a “radiometric” imager, each pixel of color on screen represents an individual temperature.[sidebar id="4"] Thermal imagers read surface temperature of objects. However, all surfaces don’t emit thermal energy equally well. Emissivity describes, via a scale from 0 to 1, the efficiency with which an object radiates or emits heat. Shiny metals have low emissivity; non-metals and painted or heavily oxidized metals have a higher emissivity. Specific applications for imagers include: measuring operational temperatures in motors or other rotating equipment; identifying leaks, blockages and settling in sealed vessels, pipes, steam systems and heat exchangers; and capturing process temperature readings. Let’s now look at each of these. Monitoring motors And Other Rotating EquipmentKey inspection points for motors include: • Bearings — Bearings under equal load should display equal temperatures. A hotter bearing on the sheave side of a motor could indicate over-tightened belts.• Belts — Sheaves that are hotter around their circumference could denote slipping belts. Belts that don’t cool between the motor and blower sheaves could signify slipping belts. Belts with unequal thermal patterns could point to misalignment.• Couplings• Electrical connections• Overall temperature — Hotter than usual results could indicate poor cooling or internal problems. Use the thermal camera every so often to quickly check overall temperature, especially of smaller motors that may not get the kind of maintenance they should. Often these motors overheat before anyone notices. Use the motor temperature rating on its nameplate as a guide. Exterior motor temperatures generally are about 36°F cooler than interior temperatures. For a routine or preventive maintenance program, it’s ideal to start with a newly commissioned and freshly lubricated motor; take snapshots of key inspection points while the motor is running. Use these images as baselines. Tip: On new motors, watch the initial startup through your thermal imager. A wiring problem or alignment or lubrication issue will show up thermally before permanent damage is incurred. As a motor ages and components become worn, heat-producing friction develops; so, its housing will begin to heat up. If possible, take additional thermal images at regular intervals, comparing them to the baseline to analyze the motor’s condition. When thermal images indicate overheating, generate a maintenance order. Thermography often is the only way to inspect small bearings — plus it checks them while the motor is running. When you’re examining small bearings:
Bearings Issue
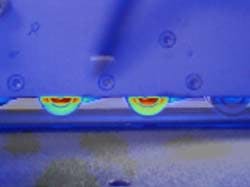
Figure 1. Two bearings in the middle are hotter than those on either side, indicating a potential problem.• Compare thermal patterns of one bearing to similar ones in the same operation (Figure 1).• Remember that small bearing failures can result in fire, mechanical stress, belt wear and increased electrical loads. When you’re looking at belts and sheaves:• Guards may restrict your view but thermography still can provide valuable information. • Be sure to re-inspect belts and sheaves after corrective action is taken. When inspecting pumps and fans, focus on the coupling:• Look for irregularities — A healthy coupling should have a consistent thermal signature. Component wear-and-tear cause abnormal heat. • Alignment issues will show up as excess heat before they cause bearing problems and then irreversible damage. Inspecting Tanks and Other Sealed VesselsMost large process tanks have built-in visual or electronic level indicators but these aren’t always reliable. A faulty sensor can lead to overfilling or inaccurate inventory figures for raw materials and finished products. Thermal inspections can reveal actual interfaces between solid, liquid and gas phases, indicating how full a vessel is and whether contents have settled or inappropriately separated. Pay particular attention to: • tank levels;• gaskets and seals;• valves; • refractory;• steam traps; and• heat exchangers.Tank levels. Contents of tanks located outside heat up during the day due to solar loading and cool off at night. Liquids and solids have a higher heat capacity than gases and so change temperature much more slowly than gas in the headspace. You can observe this temperature difference between product and headspace through most tank walls. However, at times the gas and liquid or solid may be the same temperature — so level won’t be visible. It will start to become visible as the gas gains or loses thermal energy. When a vessel is changing temperature, it’s often possible to see the thermal patterns associated with the various phases inside. Knowing the sludge level, for instance, is invaluable when it comes to operating a continuous process or preparing to clean out a tank. Thermography also can reveal floating materials such as wax and foam, as well as layers of different liquids, gases and even solids, such as the layer of paraffin that sometimes forms between oil and water in separators, hindering their normal operation. You may not discern a level if a tank is completely empty or completely full. Also, thermal imaging may prove difficult if a tank has a shiny surface or insulated walls. Gaskets and seals. Most leaks develop in or around a gasket or seal. To find a leaky gasket or seal, scan along the seal looking for thermal eccentricities. A large change in temperature along a seal or gasket indicates a loss of either heat or cold — the signature of a failure. Valves. A thermal imager can monitor control valves for leakage, stiction (sticking) or excess friction. It also can spot if a valve’s excitation coil is overheating from working too hard, pointing to a problem such as current leakage or valve size mismatch. Refractory. When inspecting refractory insulation, look for hot areas as they may indicate refractory thinning or failure. Cold areas may point to internal product build-up. Steam Trap
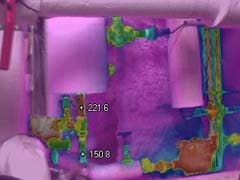
Figure 2. Correctly operating traps should show a temperature differential from one side to the other. Steam traps. Thermal imagers can rapidly check traps and lines into and out of them (Figure 2). If temperature is low in the steam pipe, trap and condensate return, the trap may be stuck closed. If temperature is high in the steam pipe, trap and condensate return, the trap may be stuck open — to make sure it hasn’t just cycled, wait a few minutes and scan it again to see if both sides remain hot. If temperature is high in the steam pipe and trap but slightly lower in the condensate return, the trap probably is operating properly. Heat exchangers. Thermal inspection can quickly and safely identify areas of corrosion, mineral deposits and sludge build-up, as well as lack of heat transfer due to external damage. Shell-and-tube exchangers often show clear and definitive areas of blockage caused by solids build-up. However, the nature of plate-and-frame exchangers means that clear and sharp temperature difference (?T) lines rarely exist. Higher resolution imagers and on-camera level-and-span adjustments typically help with capturing lower ?T often exhibited by blocked passages or clogged strainers of such exchangers. Capturing Process Temperature Readings Thermocouples or other sensors often serve for thermal measurement and control. Economics, of course, limit how many sensors can be installed. A portable thermal imager can determine the optimum spots to locate such sensors, as well as troubleshoot equipment problems. Remember Five Key Points
1. Not all problems are hot. If a fuse or switch has failed, for example, you may see an uncommonly cold connection. 2. If a panel or other piece of equipment has an internal fan, you won’t get an accurate surface temperature reading. (Obviously, disabling a fan critical to equipment cooling demands care.)
3. You can take a thermal camera into messy process areas — just cover the camera with a thin plastic bag. Plastic is transparent to infrared.
4. Over-lubrication is just as much of a problem as under-lubrication! Similarly, belts can be both over-tightened and under-tightened.
5. Water holds on to heat far longer than air. So, after a hot day, liquid inside a tank will stay warm long after the air has cooled, giving you the greatest thermal differentiation for detecting tank levels.
About the Author
John Pratten
Fluke Thermography
Sign up for our eNewsletters
Get the latest news and updates


