Instrumentation: Measure Temperature Right
Process manufacturing usually requires temperature measurements. These range from finding the temperature of fluid (liquid or gas) within a pipe or vessel to determining how hot an equipment surface is. Either contacting or non-contacting methods can provide readings. So, let’s look at them and their appropriate use.
A direct measurement requires immersing a temperature sensor in the medium, allowing heat to flow through a thermowell or other component to the sensing element. The most common temperature sensors used for direct measurements at plants are thermocouples (TCs) and resistance temperature detectors (RTDs). Various references and articles, e.g., “Select the Most Suitable Temperature Sensor,” compare and contrast these two technologies. For the purposes of this discussion, we’ll lump them together and simply refer to them as temperature sensors.
Typically, these temperature sensors are protected by a stainless steel sheath and mounted permanently in a thermowell to get a specific measurement from the process. The most appropriate location and mounting depends on the application. The signal from the sensor can go to a local display, an automation system or both.
An alternative approach involves contact but not directly with the fluid itself. Instead, it measures the surface temperature of a pipe and infers how hot the fluid within is.
Most non-contact measurement methods determine temperature by analyzing the infrared (IR) radiation thrown off by a surface using a combination of optics and detectors to zero-in on the area of interest. Depending on its sophistication, a device can take readings across a great distance or of a very small and inaccessible area. Portable devices are very common and useful for a wide range of applications. However, sensors also can be mounted permanently and send data to the plant automation system.
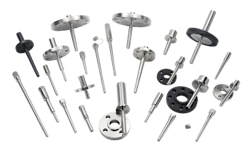
Figure 1. These fittings come in a variety of shapes and sizes for insertion into process piping and vessels.
Non-contact measurement has a number of attractions:
• Taking a reading can be extremely fast, effectively instantaneous.
• It can measure surfaces that are poor heat conductors.
• No marring or contamination of the surface being measured occurs.
• The subject can be moving.
A rotary kiln in a lime or cement plant exemplifies an ideal application. A non-contact instrument can monitor the outside jacket at the hot end to watch for degradation of the refractory lining. It can do this from a safe distance while the kiln is moving.
Of course, there are limitations:
• Non-contact technologies can’t measure liquid and gas temperatures directly.
• Some substances have peculiar emissivity characteristics that can cause incorrect measurements.
• Highly polished and shiny surfaces can pose difficulties in getting accurate readings.
• Airborne contaminants can obstruct the view, particularly over long distances.
Now, let’s look at how contact and non-contact measurement methods apply to specific situations.
Direct Measurement Of Fluids
This method probably is the most common at chemical plants. It uses a sensor to measure the temperature of a liquid or gas — getting the sensor to the desired point in the process is essential but not necessarily easy. The method is intrusive; it requires inserting the sensor into the product stream, typically using a thermowell (Figure 1). When designing a thermowell installation, mechanical issues become the most problematic elements for a variety of reasons.
First, a thermowell is directly exposed to the process and, therefore, is part of the larger process containment strategy. If the process liquid or gas is corrosive or abrasive, the thermowell must tolerate the aggressiveness of the medium; its material of construction must match or exceed the specifications of the piping and other wetted equipment. The thermowell also must withstand the process pressures and temperatures; this requires use of appropriate material cross-sections and mounting techniques to ensure leak-free service, to avoid contamination or an environmental incident.
Second, the thermowell insertion point determines where the actual measurement is made in the process. To get a reading at some specific spot within a pipe or reactor deemed critical, the thermowell must extend to that point. However, that can pose issues. For instance, mechanical or process constraints may complicate obtaining a crucial temperature measurement at the bottom of a reactor. They may necessitate installing the thermowell from a side some feet away and result in a long unsupported structure that can invite problems.
Third, mechanical issues to a large extent determine the response time of the measurement. If the process undergoes fast temperature swings, a thermowell can significantly affect how quickly the sensor sees the difference. Thick thermowell walls reduce the speed at which the sensor discerns a temperature change but may be necessary for structural reasons.
Finally, the thermowell faces stresses caused by fluid movement. Its protrusion into a flowing stream creates alternating pressure cells called vortices. The thermowell experiences vortex-induced vibration. If the frequency of the vortices matches the natural frequency of the thermowell, the resulting side-to-side movement eventually can lead to thermowell fatigue failure. If these vibrations aren’t mitigated and the thermowell isn’t strong enough to withstand them over the long term, it can fracture, causing an opening to the process.
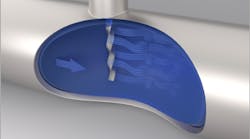
Figure 2. This twisted-square-shape thermowell breaks up normal shedding characteristics and reduces mechanical stress.
Understanding the extent of the problems and tackling these challenges requires careful thought when designing an installation. Using known process parameters, product designs, best practices and thermowell calculations can ensure a specific thermowell is strong enough to endure the conditions it will face without failure. Another method is to suppress the formation of damaging vibrations within the process by modifying the thermowell shape (Figure 2). Replacing the traditional round profile with a hard-cornered square, twisted like rifling, disrupts long vortex formation. Shorter vortices tend to balance each other reducing vibration.
Direct Measurement Of Surfaces
This option is becoming more popular as advances have addressed its traditional limitations. While the temperature of a surface might be important for its own sake, more often a surface measurement serves as a proxy for what’s on the other side. For example, we might measure the temperature of a pipe to determine how hot the fluid flowing through it is. This approach works because heat conducts through the wall to the outside; therefore, a sensor mounted directly against the surface in a way that maximizes heat transfer can infer fluid temperature.
Mounting a sensor on the outside of a pipe and inferring the process temperature from the amount of heat transferred through the wall eliminates the need for a thermowell — and all the complexity associated with it. It also enables getting temperature readings where installing temperature probes and thermowells isn’t feasible, such as in small profile pipes.
This surface-mounting approach can provide an accurate reading if done correctly. The sensor must be placed in solid, direct contact with the pipe wall and thoroughly insulated. In addition, you must make proper allowance for the thermal conductivity characteristics of the pipe, including material and thickness. You also must account for ambient temperature conditions because changing conditions can substantially affect the accuracy of the reading.
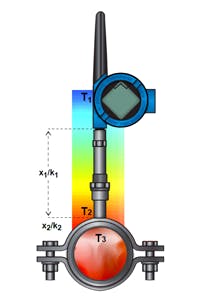
One recent development that promises to expand the applicability of surface temperature measurement is Rosemount X-well Technology (Figure 3). It is designed to measure surface temperature directly using an RTD. Its signal processing capabilities correct and compensate for heat transfer and ambient condition effects, resulting in an accurate process temperature measurement without requiring any intrusions or penetrations into the process.
The unit is installed via a simple pipe clamp assembly and then insulated. The pipe material and wall thickness are entered into the transmitter so it can calculate heat flow and extrapolate the process temperature inside the pipe. The unit also uses an ambient temperature reading taken inside the transmitter enclosure to compensate for changing ambient conditions.
Figure 3. Device uses a sophisticated series of calculations to translate a surface temperature to an accurate process value.
Non-Contact Measurement
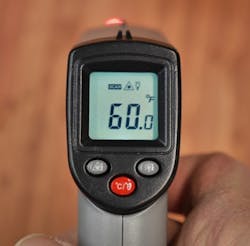
As already noted, this option doesn’t allow direct reading of liquid and gas temperature. Instead, non-contact technologies are best used on solid surfaces with known IR emissivity characteristics. Operators can measure complex heat profiles, such as temperature stratification in a reactor or the windings of an electric motor, by scanning the outside (Figure 4). Sensing devices can provide point readings or false-color representations to capture temperature changes between stages of equipment.
Such a measurement can be for the specific temperature of a solid, such as cement clinker coming out of a kiln on a conveyor belt, or can be a proxy for the contents of a vessel or pipe. The sensing device may be mounted permanently or be portable.
If used for proxy measurement, it’s important to understand the accuracy of the inferred internal measurement. This isn’t to suggest the device itself is inaccurate. Rather, you must know the characteristics of a given sensor to properly translate a reading of 87°C for the outside of a pipe into a temperature for the fluid inside. Just as for an unprotected direct-measuring sensor installed in the same place, you must correct measurements based on the thermal conductivity of the pipe, thickness, ambient conditions and so on.
Figure 4. Such a unit, by giving an estimate of a solid surface’s temperature, often can provide valuable insights.
Choose Wisely
Match the technology to the application. In many cases, a well-designed thermowell inserted in the ideal place is the best option for determining a critical temperature, say, for optimizing a reaction. However, in other situations, a sophisticated external temperature sensor mounted to a pipe that can provide an accurate measurement in a matter of minutes without a process intrusion is a better choice. Non-contact devices are highly versatile and can serve as a valuable tool but you must understand their limitations. The ability to point a hand-held sensor at complex equipment to get an approximate reading of temperature can foster crucial insights in certain situations.
With the correct application of today’s technologies, it’s getting easier to extract exactly the temperature measurement information needed to solve a problem or improve a process.
RYAN LEINO is senior global product manager, transmitters, for Emerson Automation Solutions, Shakopee, Minn. TIMCHAN BONKAT is senior global product manager, thermowells, for Emerson Automation Solutions, Shakopee, Minn. Email them at [email protected] and [email protected].


